New to JavaScript? You should tinker with userscripts

Hello good people! So this might come as a bit of unexpected advice. But if you're new to JavaScript or Web development in general, you really should consider playing around with userscripts.
In this article, I will try to explain what are userscripts, why I feel they are still relevant, and why you should try to make your own.
So what are userscripts? 🤔
UserScripts are JavaScript programs that let you alter the behavior of a Web page. If you want the full definition, you can check out the Wikipedia definition. In a nutshell, they let you customize any webpage you want.
But now you might wonder; "what's so useful about this?" well, they are a gamechanger. Think about it, you can inject any JavaScript code you like. This means you can also inject CSS and HTML. Practically, any website you visit can be altered the way you want it!
Let's suppose you're learning web development, and you want to add dark mode to Instagram. Well, you can! You just need to fire up your dev tools, write the CSS you want, and inject it via JavaScript. One interesting example is this translate-json userscript I made you can checkout.
The true strength of userscripts is that you can install 3rd party userscripts. Usually, if you think of something, there might be a developer who sank some time developing a userscript for it. You can find really useful userscripts in Github or Greasyfork.
Are userscripts dangerous? 💀
Before installing 3rd party userscripts, please be aware that:
- They can be enabled on one or several websites.
- They can contain malicious code that can harm your privacy or steal important data.
- They can hurt your browsing experience by breaking some functionalities.
If you're really curious, check out these StackOverflow answers:
- Is it risky to run my own userscripts on all addresses?
- How safe is GreaseMonkey? #1
- How safe is GreaseMonkey? #2
Of course, the main subject here is that we want to create our own userscripts. So now that we got this out of the way let's have some fun.
How to install userscripts? 💻
Userscripts are executed by a specific extension, it will let you manage your installed userscripts and help you understand where they will be running for example.
If you're a Chrome (or other Chromium-based browser) user, you'll have to install TamperMonkey 🔳. Once installed, it will open a page with a disclaimer just in case.
If you're a Firefox user, you can install GreaseMonkey 🐵.
Once it's done, locate the GreaseMonkey/TamperMonkey icon in the extension bar and click on it and choose the "New user script..."/"Add a new script...", you will be greeted with a window as below:
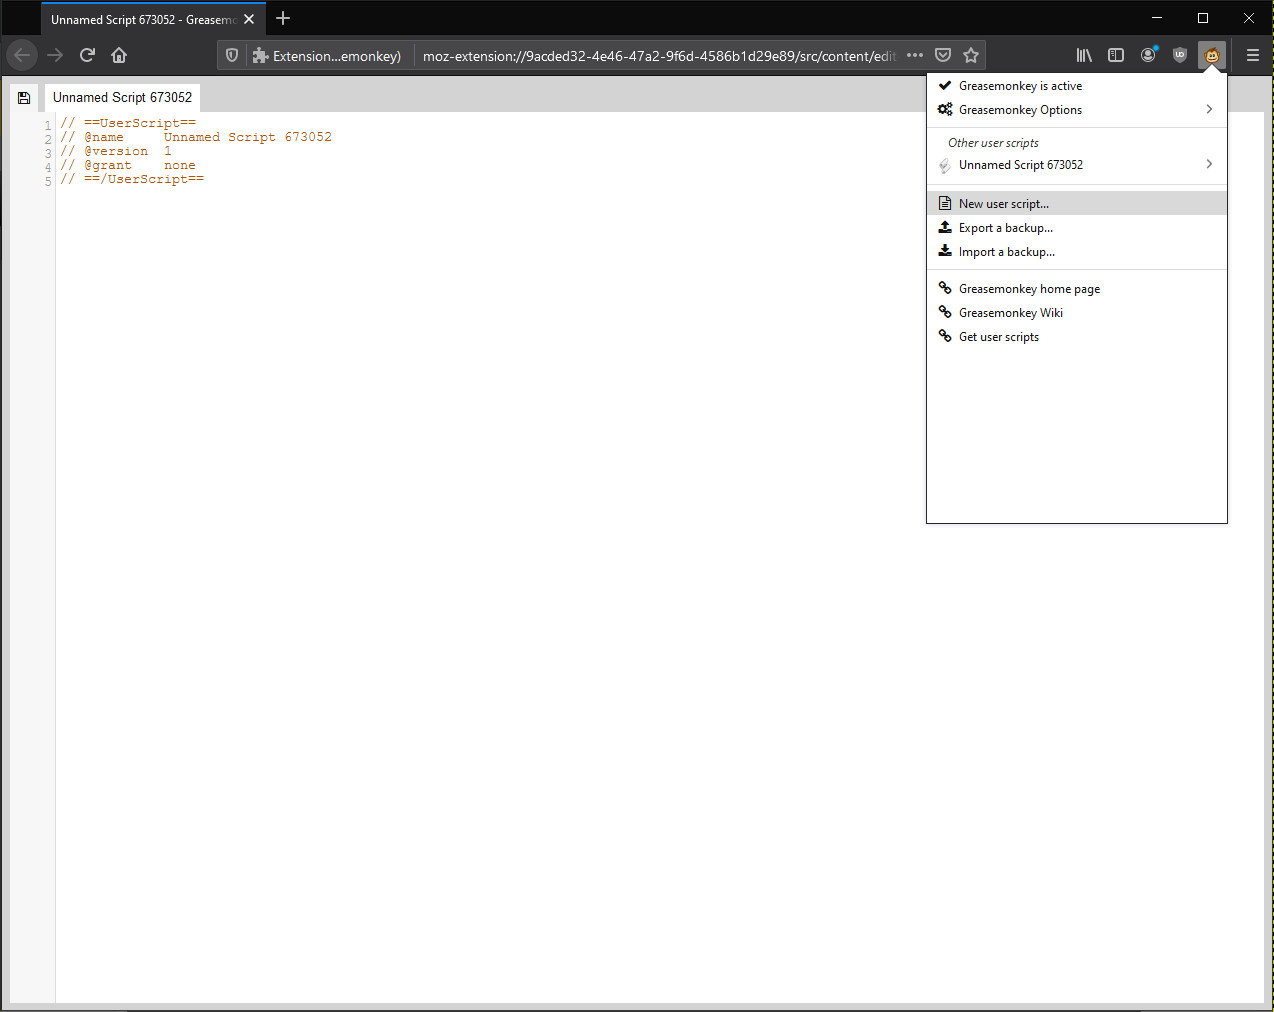
GreaseMonkey's new script UI on Firefox.
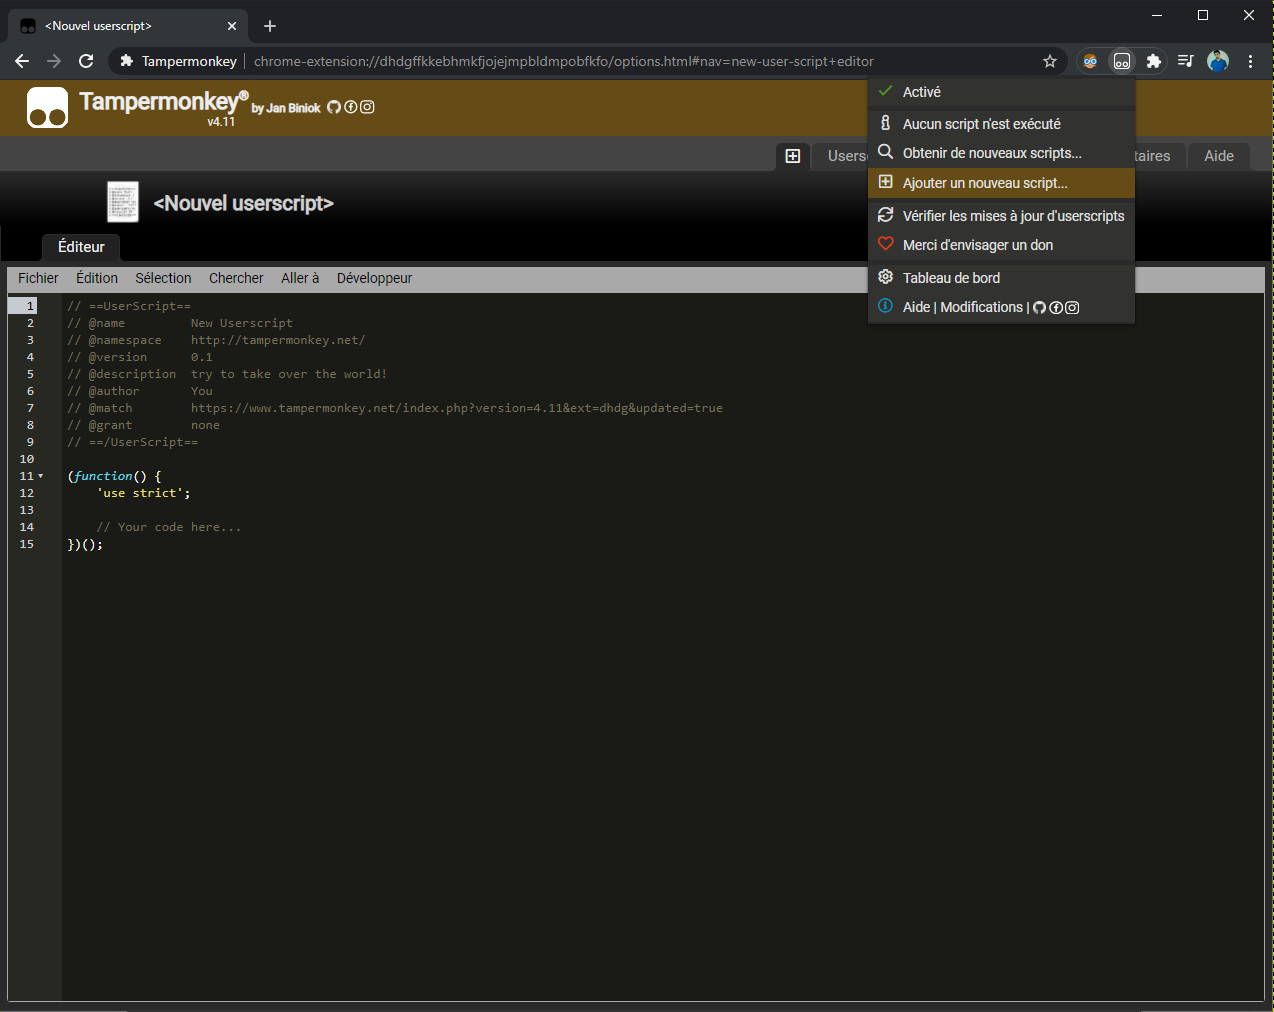
TamperMonkey's new script UI on Google Chrome.
Now that you are all set, let’s examine this generated code and try to make something simple.
How to write my userscript? ✍️
You will notice that GreaseMonkey and TamperMonkey have already added you a small header of comments to your userscript. This is the most important part of your script. It will define the name, version, description, and other info. I'll be talking about the script auto-generated by Tampermonkey since it's more complete.
// ==UserScript==
// @name         My cool userscript
// @namespace    https://backup-blog.tarekjellali.com/
// @version      0.1
// @description  try to take over the world!
// @author       You
// @match        https://backup-blog.tarekjellali.com/
// @grant        none
// ==/UserScript==
(function() {
    'use strict';
    console.log('Hello world! This is some injected JS!');
 })();
Below the Tampermoneky code auto-generated that I've altered to run on my blog, you can safely copy-paste it and refresh this page. If you then look at your console, you will see that console.log.
As you can see, everything looks straightforward. If you want to learn more about each of these userscript header variables you can check the TamperMonkey documentation.
The most important value to look for is @match which tells TamperMonkey where to run your script. For this specific situation, we've set https://blog.tarekjellali.com as the domain we want this script to be running at. You can also use @include which will give you more granular control. The difference between the two is that @include can work with regular expressions while @match doesn't, as pointed out here.
Okay, now let's get into the real deal. After the header, you can notice a function (more accurately IIFE) that is supposed to contain the code you want to inject. In our case, I've just added a console.log.
Making userscripts easier to work with 🐣
Now you might ask yourself a lot of questions, I'll try to guess some of them;
- How do I get started?
- How do I inject HTML?
- How do I inject CSS?
- What if I want to write in TypeScript?
- What if I want to have a nice structured project and a non-confusing build process?
Okay, you might not have asked yourself the last question, but I did. I wrote some userscripts mostly for work or for fun, but I found it daunting if the script became complicated. Plus since I'm invested a lot into TypeScript, I didn't like working without the luxury of type checking.
This is where I present to you my humble greasemonkey-webpack-typescript-boilerplate (yes I know, the name is not original at all). But the main purpose of this boilerplate is to provide you with enough convenient tools to start building. You can import SASS/SCSS/CSS files easily and inject them. You can also import HTML as modules then easily inject them into a page.
How to use this boilerplate? ⌨
If you're interested to get started with this boilerplate, just head to my repository and locate the button "Use this template" on the right corner just next to the About box. You'll be able to create your own repo, based on the boilerplate and without anything superfluous.
Once you've created it, just clone your repo locally, open a terminal, and input npm i. This will install for you the few dependencies the project needs to build. Don't worry, by the time you build the script, the project will not use external dependencies. Once npm finished, just open your project with your favorite code editor.
Below the interesting repo parts:
├📂dist/
├─🟨 greasemonkey-webpack-typescript-boilerplate.user.js
├📂src/
├─📂html/
│  └📄main-content.html
├─📂scss/
│ └🎨style.scss
└🟦index.ts
🟨post-build.js
🟩package.json
📦webpack.config.js
Though I hope it's self-explanatory, let's go through the files to quickly understand the structure;
- The
dist/folder will contain your userscript. What's convenient about this is that you can just link the raw file via Github TamperMonkey/GreaseMonkey will recognize it and prompt you if you want to install it. - Under the
src /folder it's straightforward:main-content.htmlcontains your HTML to inject. You can add whatever you want or simply omit it if you don't need it.style.scsscontains all your styles. If you want, you can write CSS there but I highly advise you to try to write SCSS, it's fun 😀 !index.tscontains your main entry point. You can add more TS files and import them and so on. As you might have noticed, I've just included the bare minimum as follows:
import "./scss/style.scss"; // Nothing else needed, the compiled CSS will be injected automatically
import APP_HTML from "./html/main-content.html"; // Your HTML you want to inject

export class App {
  constructor() {
    this.injectHTML(APP_HTML);
    // A console log to see if it's working
    console.log("If you see this message, it means that the script has been injected :)");
  }
  /**
   * A simple method that will append your HTML at the end of the body tag
   */
  private injectHTML(htmlContent: string) {
    document.querySelector("body").insertAdjacentHTML("beforeend", htmlContent);
  }
}

// Create the app instance to run everything
const yourAppInstance = new App();
// A test log here too
console.log(yourAppInstance);
Finally, before you start hacking please follow those important steps:
- Edit the
🟩package.jsonand change thename, version, description, author, license, bugs.url and homepagevalues to your liking. - In
🟨post-build.jschange line 24 and 25 (@match and @grant) to fit your needs. The other values as you might notice in the script are extracted from your🟩package.json. - To build your script, simply run
npm run buildand your script will be generated in thedist/folder. If you've named your package correctly, your userscript will be named[your_package_name].user.js.
Wrap-up 📦
In this article I've tried to present you userscripts and why they can help you learn Web development and JavaScript in a different way. What I really like about this approach is that you go into the field and start hacking things. This helps you understand how a lot of websites and web apps work. I really hope this was helpful for you and I wish you the best in your development journey.
As usual, if I made some mistake or forgot to mention something, you know the drill.
Cheers!
Image source Free-Photos from Pixabay
About the author
Software Engineer • TypeScript • JavaScript • Angular • VueJS • WordPress • Ex-founder of ng-enious
Comments
Join the discussionVery glad you liked it! 😀