Create an npm package easily in JavaScript/TypeScript
Software Engineer • TypeScript • JavaScript • Angular • VueJS • WordPress • Ex-founder of ng-enious
Hello good people! In this article, we're going to create an npm package step by step. By the end of this article you will be able to:
- Build your own package
- Use it on other projects
- Publish it on npm
- [Bonus] Publish your TypeScript types with your package
ℹ Note: Be sure to read my previous article "The anatomy of a package.json" as we'll be reusing some subjects from it.
Before we begin, I've added a commit hash that links to a demo repository here to help you understand what's happening.
What is an npm package? 🤔
npm packages are reusable JavaScript packages meant to help you reuse less code. You've surely heard of lodash, Moment, express and so many others!
Every time you npm install some-awesome-package you're asking npm to download and extract the package to the node_modules/some-awesome-package folder. You can then import/require it to use it in your JavaScript/TypeScript code.
Packages help you make your code modular by providing you reusable code. It's in a way like custom lego blocks that save you the hassle of creating everything from scratch.
What's interesting is that a lot of packages also use other packages called dependencies. This is why you usually find a lot of folders inside your project's node_modules. If well done, this lets you save a lot of time and provides you with robust code that's been tested and validated by a lot of other developers, just like you!
Just before we carry on if you're very curious about how npm deals with dependencies and want to deep dive into its complex inner-workings, check out this excellent article.
How to built an npm package? 🏗
To build our npm package, we'll have to follow few simple steps:
- Writing the package, the actual code.
- Linking and consuming the package in a sample app.
If you want to follow along with this guide, start by creating a base folder, I'll name mine as build-npm-package-example/. I'll try to show you the current file tree on every step change.
Writing and preparing the package 👨💻 #7f19fa8
Every npm package starts with a package.json file. Let's create a scratch folder named my-awesome-package/ under our base folder. Next, open your favorite command tool into that folder and type the following:
npm init -y
The -y flag tells npm to not bother prompting us with any questions, especially that this will be just a scratch package for now.
Next, let's create a file called index.js in the same folder as our package.json and add the following code:
// my-awesome-package/index.js

exports.printName = function(name) {
    console.log('Hello ' + name + ' 👋');
};
Our package, for now, will have a single module that takes a name and greets it with a simple console log.
Now type the following command:
npm pack
You'll see a generated file named my-awesome-package-1.0.0.tgz this is effectively our npm package ready to be consumed by other developers! We won't use it for this guide, but you can open it using for example 7zip and view its contents.
By the end of this step, you should have the following file tree:
├📂build-npm-package-example/
└─📂my-awesome-package/
   ├🟨index.js
   ├🟩package.json
   └📚my-awesome-package-1.0.0.tgz
Consuming the package in a sample app 🔗 #7c78957
Let's now create a folder called sample-app/. Inside this folder, you'll need to run another npm init -y.
Once your package.json is generated, let's link our package to this sample app as follows:
cd my-awesome-package
npm link
cd ../sample-app
npm link my-awesome-package
If we check the node_modules/ folder of our sample-app/ we'll find that there is a new folder called my-awesome-package/. It's not a copy though, behind the scenes, npm made a system link between our package folder and our sample app.
In my-awesome-package/ folder you'll notice a package-lock.json generated once you input npm link. #cfea861
Now that our package is linked, we can consume it. In your sample-app/ folder. Create an index.js file with this code:
// sample-app/index.js

const myModule = require('my-awesome-package')

myModule.printName('Hashnode');
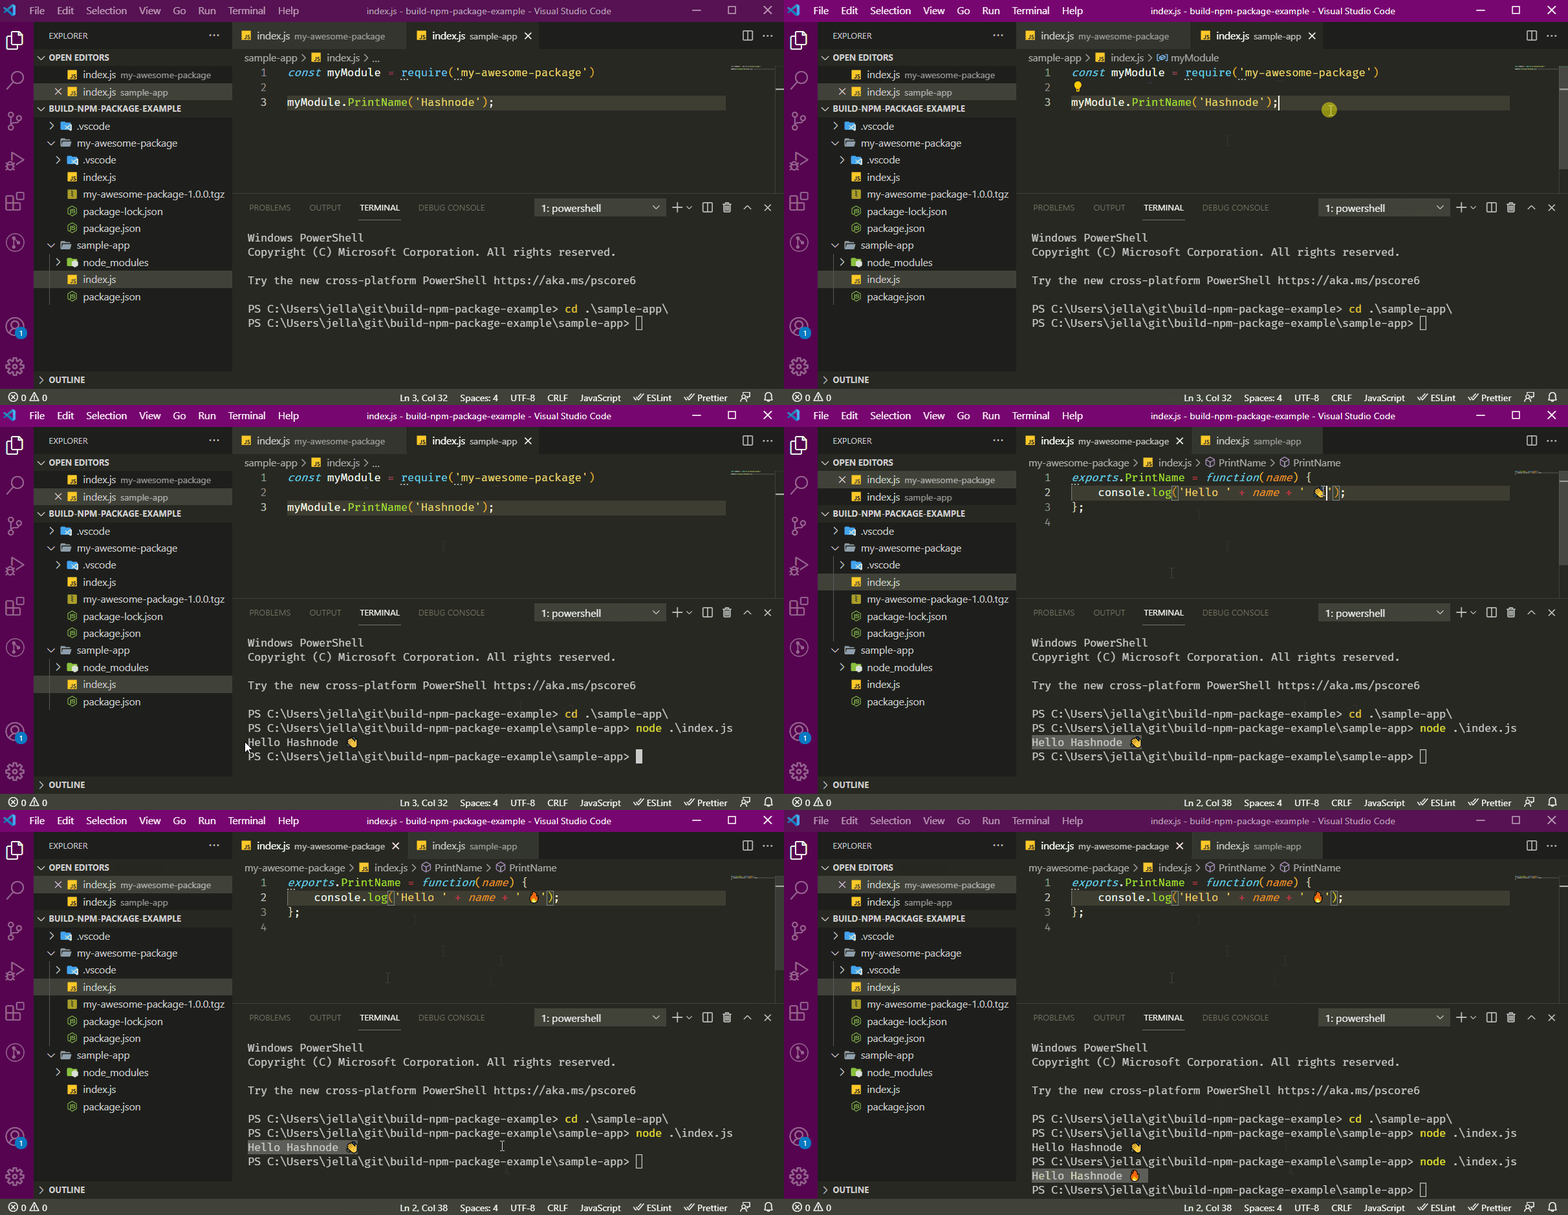
If you next run node ./index.js you should see Hello Hashnode 👋. Because "my-awesome-package" is linked to our sample app, changes in the package are instantly reflected in our sample app. Below a GIF where I change the console.log content to:
console.log('Hello ' + name + ' 🔥');
And you can see that by running node ./index.js in our sample-app/ the greeting message changed to `Hello Hashnode 🔥'. #fa9e104
By the end of this step, you should have the following file tree:
├📂build-npm-package-example/
├─📂my-awesome-package/
│  ├🟨index.js
│  ├🟩package.json
│  └🟩package-lock.json
└─📂sample-app/
   ├🟨index.js
   └🟩package.json
Publishing your package to npm 🌍
To publish your package to the npm repository, you'll first need to create an npm account. Once this is done, you should head to the folder of your package and input the following command:
npm adduser
npm will prompt you for your username, password and, email. If your next run:
npm publish --dry-run
The flag --dry-run tells npm to do everything as usual but not actually publish the package to the npm repository. You should see the following output:
npm notice
npm notice package: @tarkant/my-awesome-package@1.0.0
npm notice === Tarball Contents ===
npm notice 87B  index.js
npm notice 241B package.json
npm notice 194B .vscode/settings.json
npm notice 498B my-awesome-package-1.0.0.tgz
npm notice === Tarball Details ===
npm notice name:          @tarkant/my-awesome-package
npm notice version:       1.0.0
npm notice package size:  1.1 kB
npm notice unpacked size: 1.0 kB
npm notice shasum:        4232f6b7993c06be9431b95d3596effe4740cd47
npm notice integrity:     sha512-99fO8veOFv2YH[...]k+78Pwa9LzyUw==
npm notice total files:   4
npm notice
+ my-awesome-package@1.0.0
Warning ⚠: You won't be able to publish "my-awesome-package" as it's an already reserved namespace. You'll have to be creative in naming your package.
Removing your published package 🚮
Suppose you didn't set the flag --dry-run and accidentally pushed your test package to npm. You'll want to unpublish your package. Please take into consideration the following points:
- Past 72 hours after you publish, you won't be able to remove your package only if:
- There are no other packages in the public npm registry depending on it.
- Your package has less than 300 downloads over the last week.
- You are the single owner/maintainer.
- You can't undo an unpublish, this is permanent.
- If you fully unpublish a package, you'll have to wait 24 hours to publish again with the same name and version.
Please read more here in the npm Unpublish Policy.
Now that you've been warned, here's the single command you need to unpublish your package:
npm unpublish <package_name> --force
You can also unpublish a specific version of your package using the following command:
npm unpublish <package-name>@<version>
If you'd like to read more, check out the official npm documentation here.
Publishing under a namespace 📝 #d5e8cf4
In our previous example, "my-awesome-package" was a name already in use. In most situations, you'll have to be creative with package names. This is not your only resort though as you can prefix the name of a package with your username. For example:
You can replace my-awesome-package to @<yourusername>\my-awesome-package or more generally @<yourusername>\<your-package-name> format. In my case it would be:
@tarkant/my-awesome-package
To publish your package using your username, you will need to add a specific flag to avoid a HTTP 402 error.
npm publish --access public
This will tell npm that you're trying to publish a public package as private packages are for paid members only.
ℹ By the end of this step, you should have the following file tree:
├📂build-npm-package-example/
├─📂my-awesome-package/
│  ├🟨index.js
│  ├🟩package.json
│  └🟩package-lock.json
└─📂sample-app/
   ├🟨index.js
   └🟩package.json
Use Webpack to generate your package ⚙
Writing your own npm package can become a little bit complicated if you don't use a module bundler. Besides, the more your package will grow and become complex, the more it will be hard to maintain it without a module bundler. Lastly, using a module bundler will help you for example use TypeScript and seamlessly build your package to JavaScript.
Let's get back to our my-awesome-package and run the following command: #7a945d6
npm i -D css-loader sass sass-loader style-loader ts-loader typescript webpack webpack-cli webpack-dev-server
This will install all the development dependencies we need to build our package. Next, we'll have to create a file called webpack.config.js with the following content: #5077d24
// my-awesome-package/webpack.config.js

const path = require('path');

const PACKAGE_NAME = 'MyAwesomePackage';

const config = {
  context: __dirname,
  entry: {
    app: './src/index.js',
  },
  output: {
    filename: 'main.js',
    path: path.resolve(__dirname, 'dist'),
    libraryTarget: 'umd',
    library: PACKAGE_NAME,
    umdNamedDefine: true,
    globalObject: 'this',
  },
  module: {
    rules: [
      {
        test: /\.ts?$/,
        loader: 'ts-loader',
        exclude: /node_modules/,
      },
      {
        test: /\.s[ac]ss$/i,
        use: [
          'style-loader',
          'css-loader',
          'sass-loader',
        ],
      },
    ]
  },
  resolve: {
    extensions: ['.ts', '.js']
  },
  devServer: {
    contentBase: path.join(__dirname, 'dist'),
  }
};

module.exports = (env, argv) => {
  return config;
};
This file tells Webpack to:
- Look for the entry file in
./src/index.js, I moved the file accordingly #3bb5610 and changed the emoji for test purposes 😁! - Put the output file into
main.jsand copy it to thedistfolder. - Target the Universal Module Definition.
- Assign a name to the library from our const
PACKAGE_NAME. - some other miscellaneous configuration items.
Now let's add those two files: #c062ae2
// my-awesome-package/tsconfig.json

{
    "compilerOptions": {
      "module": "commonjs",
      "target": "es5",
      "sourceMap": true,
      "resolveJsonModule": true,
      "esModuleInterop": true,
    },
    "exclude": [
      "node_modules"
    ]
}
// my-awesome-package/tsconfig.build.json

{
    "extends": "./tsconfig.json",
    "compilerOptions": {
      "declaration": true,
      "emitDeclarationOnly": true,
      "outDir": "dist/types"
    },
    "exclude": [
        "./src/app.ts"
    ]
}
Those two files tell the TypeScript compiler how to behave when building our package. Nothing too fancy.
For the final touches, we need to change our package.json to the following: #aca186b
// my-awesome-package/package.json

{
  [...]
  "main": "dist/main.js",
  "scripts": {
    "build": "webpack --mode production",
    [...]
  },
  [...]
}
The main field tells npm what file to look for as the entry point of our package. And the build field just runs Webpack in production mode to build our package.
If everything went as planned, running an npm run build you should see a main.js under the dist folder.
Back to our sample-app I've just corrected the namespace for my package (#36fd773) and redid the npm link and npm link @tarkant/my-awesome-package accordingly. Be sure to do the same if you're following along!
If we now run a node ./index.js in our sample app, we should see Hello Hashnode 😁 as an output, success! Now since Webpack does the heavy lifting for us, we can for example use the export statement without worrying if it will work on every NodeJS/Browser version! Example: (22b3f2b)
// my-awesome-package/src/index.js

export const PrintName = (name) => {
    console.log('Hello ' + name + ' 🎉');
};
ℹ By the end of this step, you should have the following file tree:
├📂build-npm-package-example/
├─📂my-awesome-package/
├──├─📂src/
│  │  └🟨index.js
│  ├🟩package.json
│  ├🟩package-lock.json
│  ├🔵tsconfig.build.json
│  ├🔵tsconfig.json
│  └📦webpack.config.json
└─📂sample-app/
   ├🟨index.js
   └🟩package.json
Finally, the biggest bonus with this configuration is that it supports TypeScript and SCSS out of the box. You can just go ahead and rename index.js to index.ts and change the webpack.config.js config.entry.app = './src/index.ts'. #d359a1e
ℹ By the end of this step, you should have the following file tree:
├📂build-npm-package-example/
├─📂my-awesome-package/
├──├─📂src/
│  │  └🟦index.ts
│  ├🟩package.json
│  ├🟩package-lock.json
│  ├🔵tsconfig.build.json
│  ├🔵tsconfig.json
│  └📦webpack.config.json
└─📂sample-app/
   ├🟨index.js
   └🟩package.json
[Bonus] Publish your TypeScript type definitions with the package 📘
If you don't know what we're talking about, it's ok. But I really advise you to learn TypeScript as it will help you greatly improve your code overall! One good thing about making a TS package is that you can also ship the type definitions of your modules in the package. This lets other ts developers easily work with your package and save them the hassle of figuring out what does what in your package.
Side note ℹ: Type definitions can also be used in JS, check the last sample of code in this section.
To build the types and point them to npm, you just need to slightly alter the build script and add a "types" entry as follows: (#83f6df0)
// my-awesome-package/package.json

{
  [...]
  "types": "dist/types/index.d.ts",
  "scripts": {
    "build": "tsc --build ./tsconfig.build.json && webpack --mode production",
    [...]
  },
  [...]
}
If you then run an npm run build in my-awesome-package/ you'll notice a new folder called types with and index.d.ts with the following content:
// my-awesome-package/dist/types/index.d.ts

export declare const PrintName: (name: any) => void;
Let's adjust our code so we can have good type definitions: (#209403c)
// my-awesome-package/src/index.ts

export const PrintName = (name: string): void => {
    console.log('Hello ' + name + ' 🎉');
};
If you run again npm run build you'll see that our types/index.d.ts has been updated accordingly:
// my-awesome-package/dist/types/index.d.ts

export declare const PrintName: (name: string) => void;
Your types will be working flawlessly on any TypeScript project. But I still got a trick under my sleeve if you've followed all along until here! You can use those typings in JavaScript too! Let's head back to our sample app and add this line to our package.json file: (#e486259)
// sample-app/package.json

{
  "name": "sample-app",
  "type": "module",
  [...]
  [...]
}
Now in index.js, let's replace the code with the following:
// sample-app/index.js

/// <reference types="@tarkant/my-awesome-package" />
import MyAwesomePackage from '@tarkant/my-awesome-package';

MyAwesomePackage.PrintName('Hashnode');
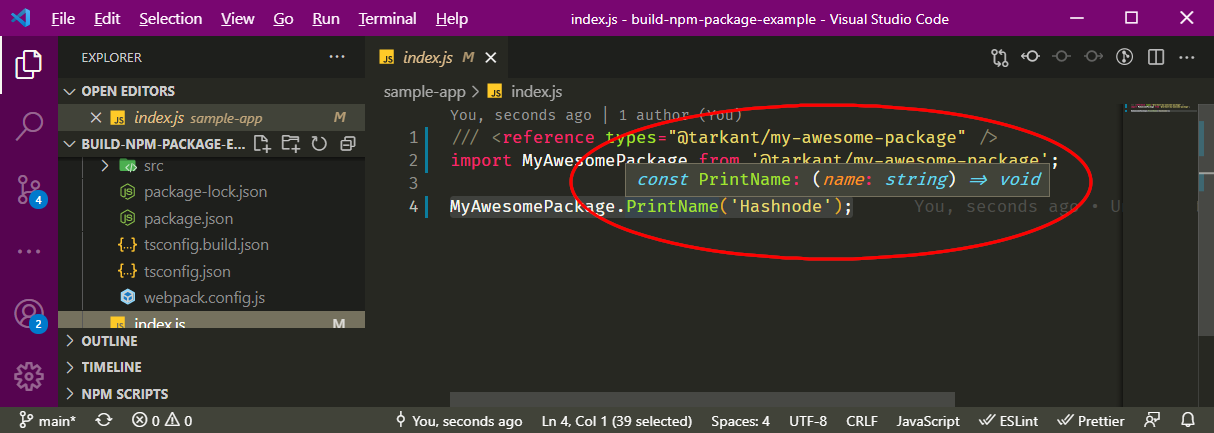
The first line tells VSCode to use the types located in our package.
The second line loads the package as a module, notice its name as "MyAwesomePackage" just like we defined it in our my-awesome-package/webpack.config.js in const PACKAGE_NAME. And finally, the last line calls our PrintName() function. If you hover on it with your cursor, you should see its type definition just like this screenshot:
Warp-up 📦
And that's it! We've discovered what's an npm package. Then we tried to make our own simple package and consume it. We also saw how to publish our package. Next, we tried to use Webpack to bundle our package and optimize it. Finally, we've backed in TypeScript typings into our package for better reusability.
There are still many things to talk about but I feel that we should keep it for part 2. Especially that there is a lot of information to retain. I really hope you'll find this article useful! Again, you can find this repository with each step as a simple commit.
If you feel that I've forgotten a detail or didn't explain something well, please let me know.
Cheers!
Photo by @image4you from Pixabay.com.